Open Google Doc to Signed PDF — System Flow Client reviews and signs via your Fillout form Their details fill your contract name, company, signature Signed PDF is generated from your Google Doc Agreement delivered to your client saved and shared automatically
Client action
Handled automatically
Done
Client
Handled automatically
Done
Google Doc to Signed PDF — Signed, Sent, Done
How It Works
- A client fills out your Fillout e-signature form, entering their name, company, title, and signature
- Relay copies your Google Doc agreement and fills in their details automatically
- The completed agreement is exported as a signed PDF
- The PDF is shared with the client via Google Drive. No email required.

Blessing Richardson
AI Strategist & Fractional Consultant
I built my first webpage in elementary. More than 20 years later, I still love web and software tech. While building is fun, there's so much more joy in watching others discover what technology makes possible.
Frequently Asked Questions
Do I need Relay.app, or can I use a different automation platform?
The workflow is templated for Relay because that's what handles the Google Doc copy, field merge, PDF export, and share step in one place. You can rebuild the same flow in Zapier, Make, or n8n — the agreement template and intake form are platform-agnostic — but you'll have to wire the steps yourself.
Can I use this with an e-signature tool other than the built-in Fillout signature?
Yes. The Fillout signature is the lightest setup, but the workflow's last step is just "share the PDF." Swap that for DocuSign, HelloSign, or Dropbox Sign by routing the generated PDF to them instead of attaching it to the form response.
Step 1: Agreement Template
Your Agreement Template
You'll work with two copies of your Google Doc: a working draft for edits and a published version that runs the automation. Set this up before anything else.
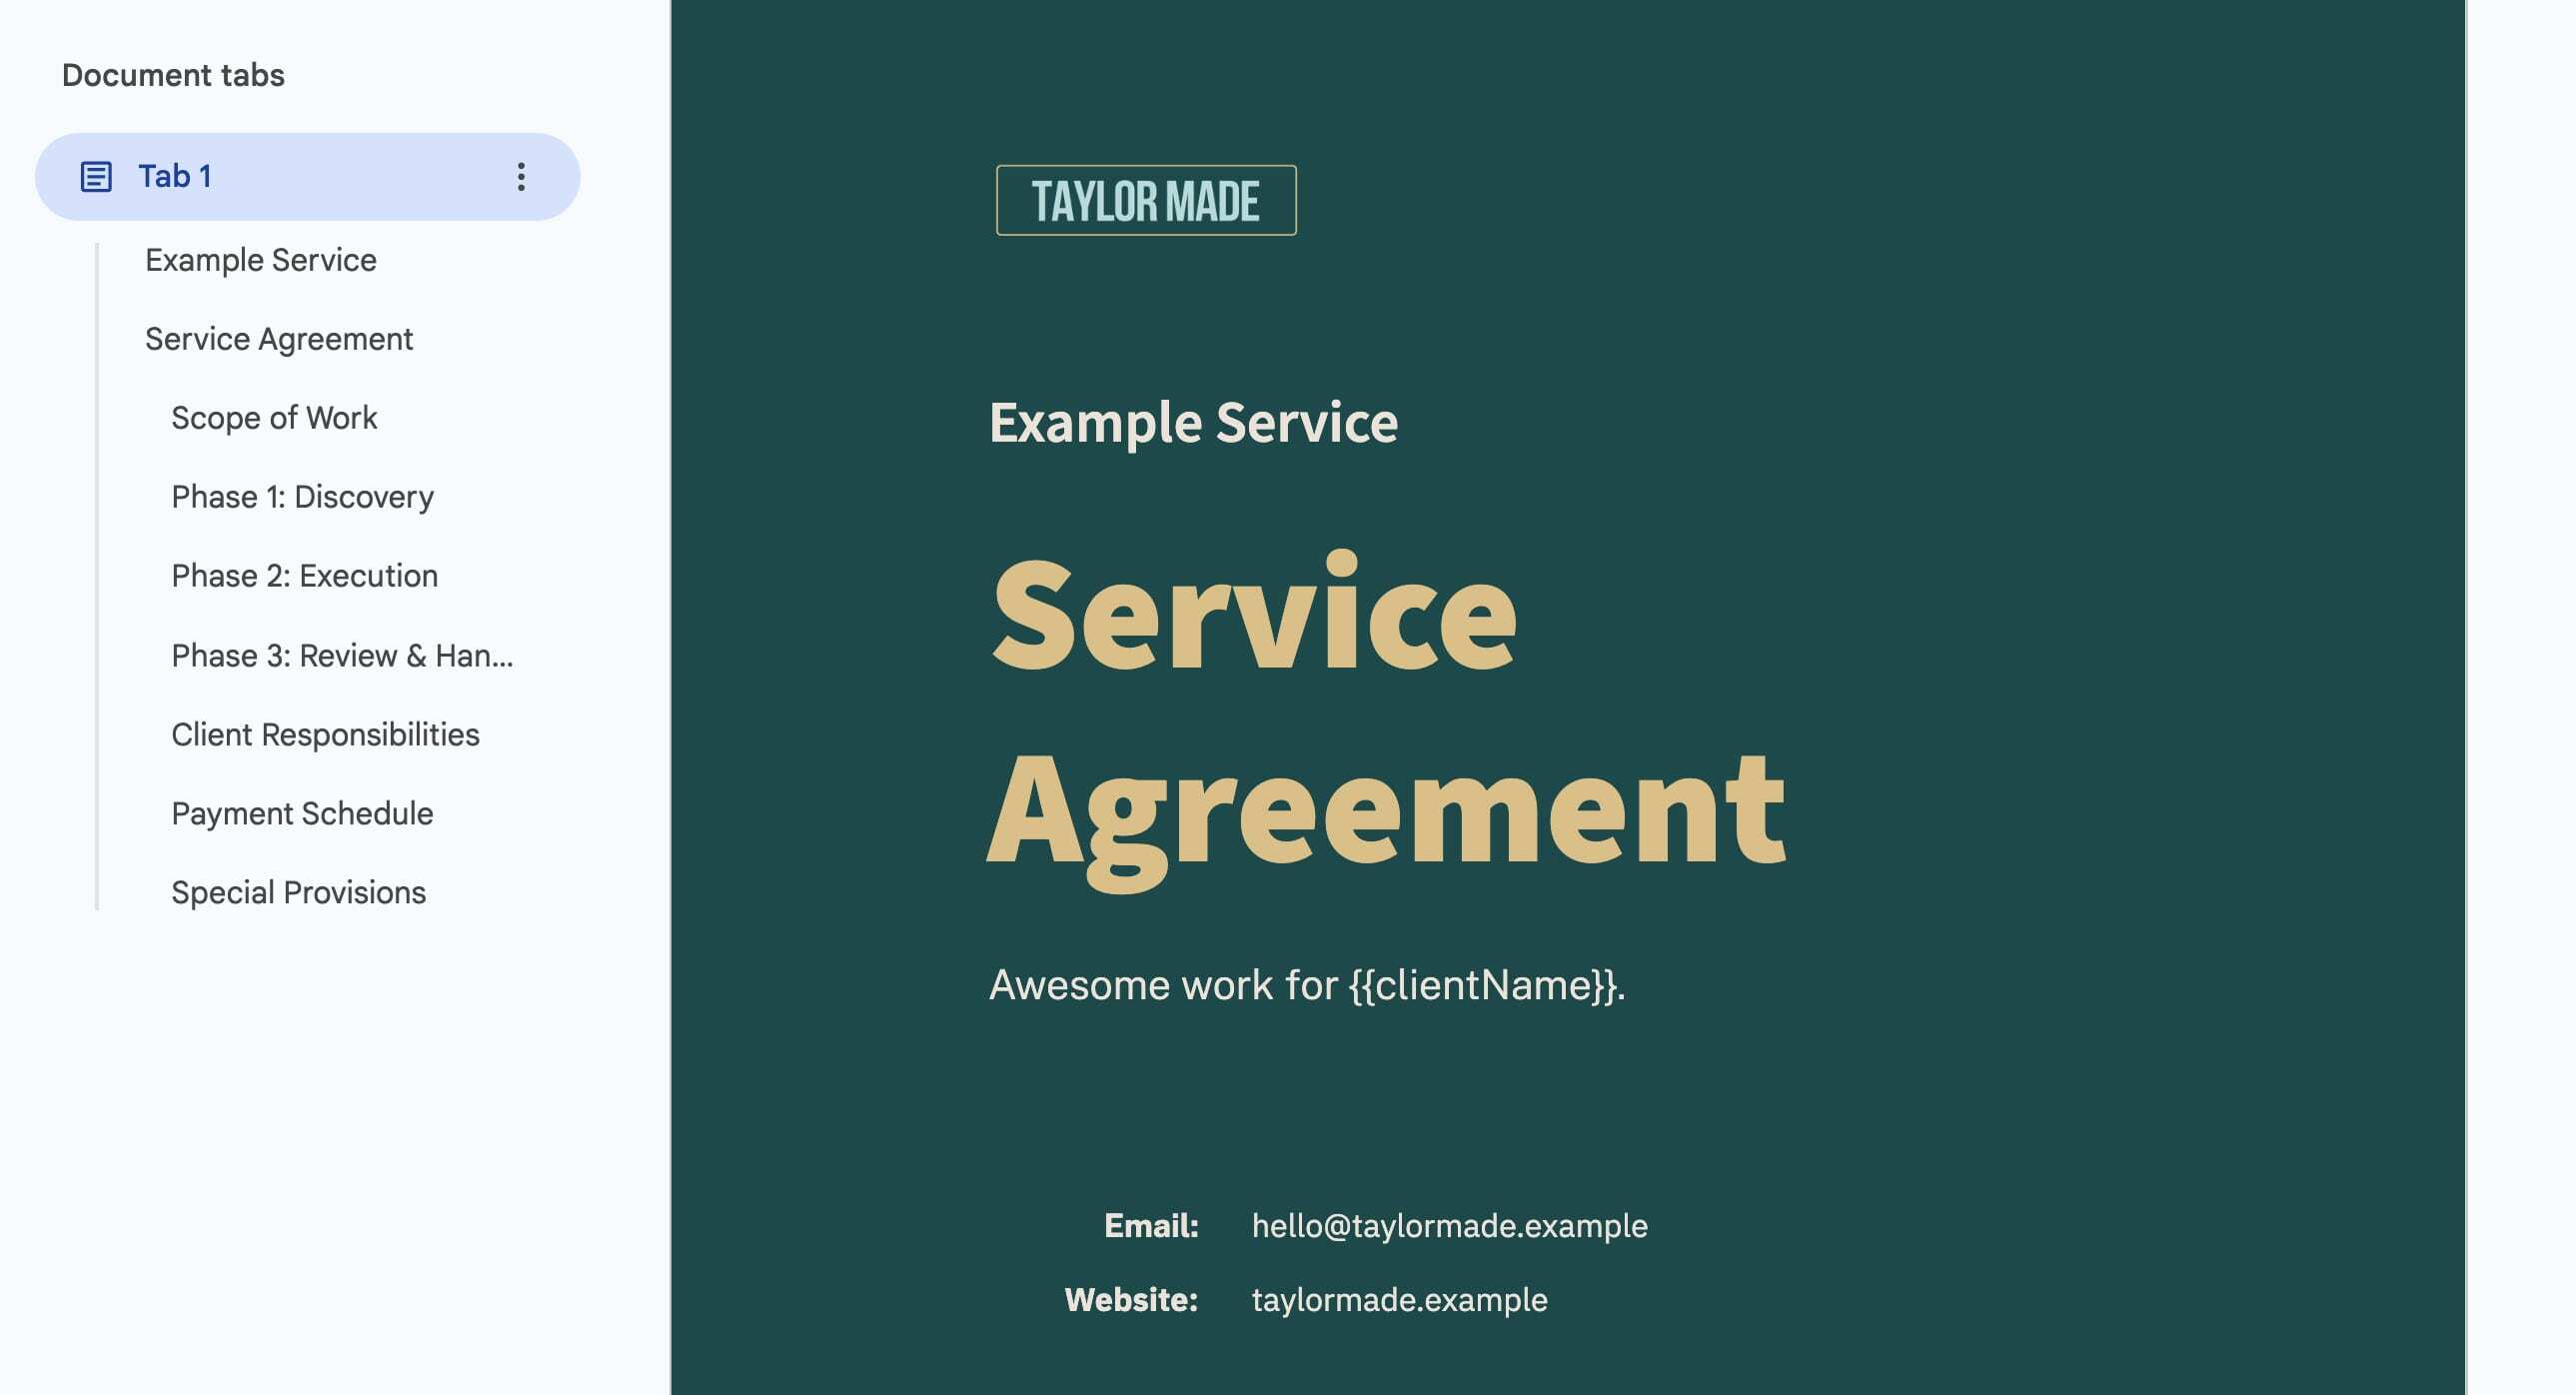
1.1 Customize the template
- Open the Google Doc template
- Go to Tools > Variables and update your business name, email, and website. They populate throughout the doc automatically.
- Swap your logo in on the cover and signing pages
- Update the scope, payment terms, and any provisions to match how you work
- Review the
{{placeholder}}merge fields. If they work for your agreement, leave them as-is. If you need different fields, rename them to fit your needs. Keep the{{curly brace}}format either way.
Need to change your placeholders? See Customizing Your Google Doc for the full reference.
1.2 Save a published version
Make a copy of your finished template. This is the published version you'll link to in Relay. Keep your original as the working draft for future edits.
1.3 Export as PDF
Export the published version as a PDF.
Step 2: Intake Form
Your Intake Form
This is the form your clients fill out to sign the agreement. Start by cloning the template, then customize it to match your Google Doc.
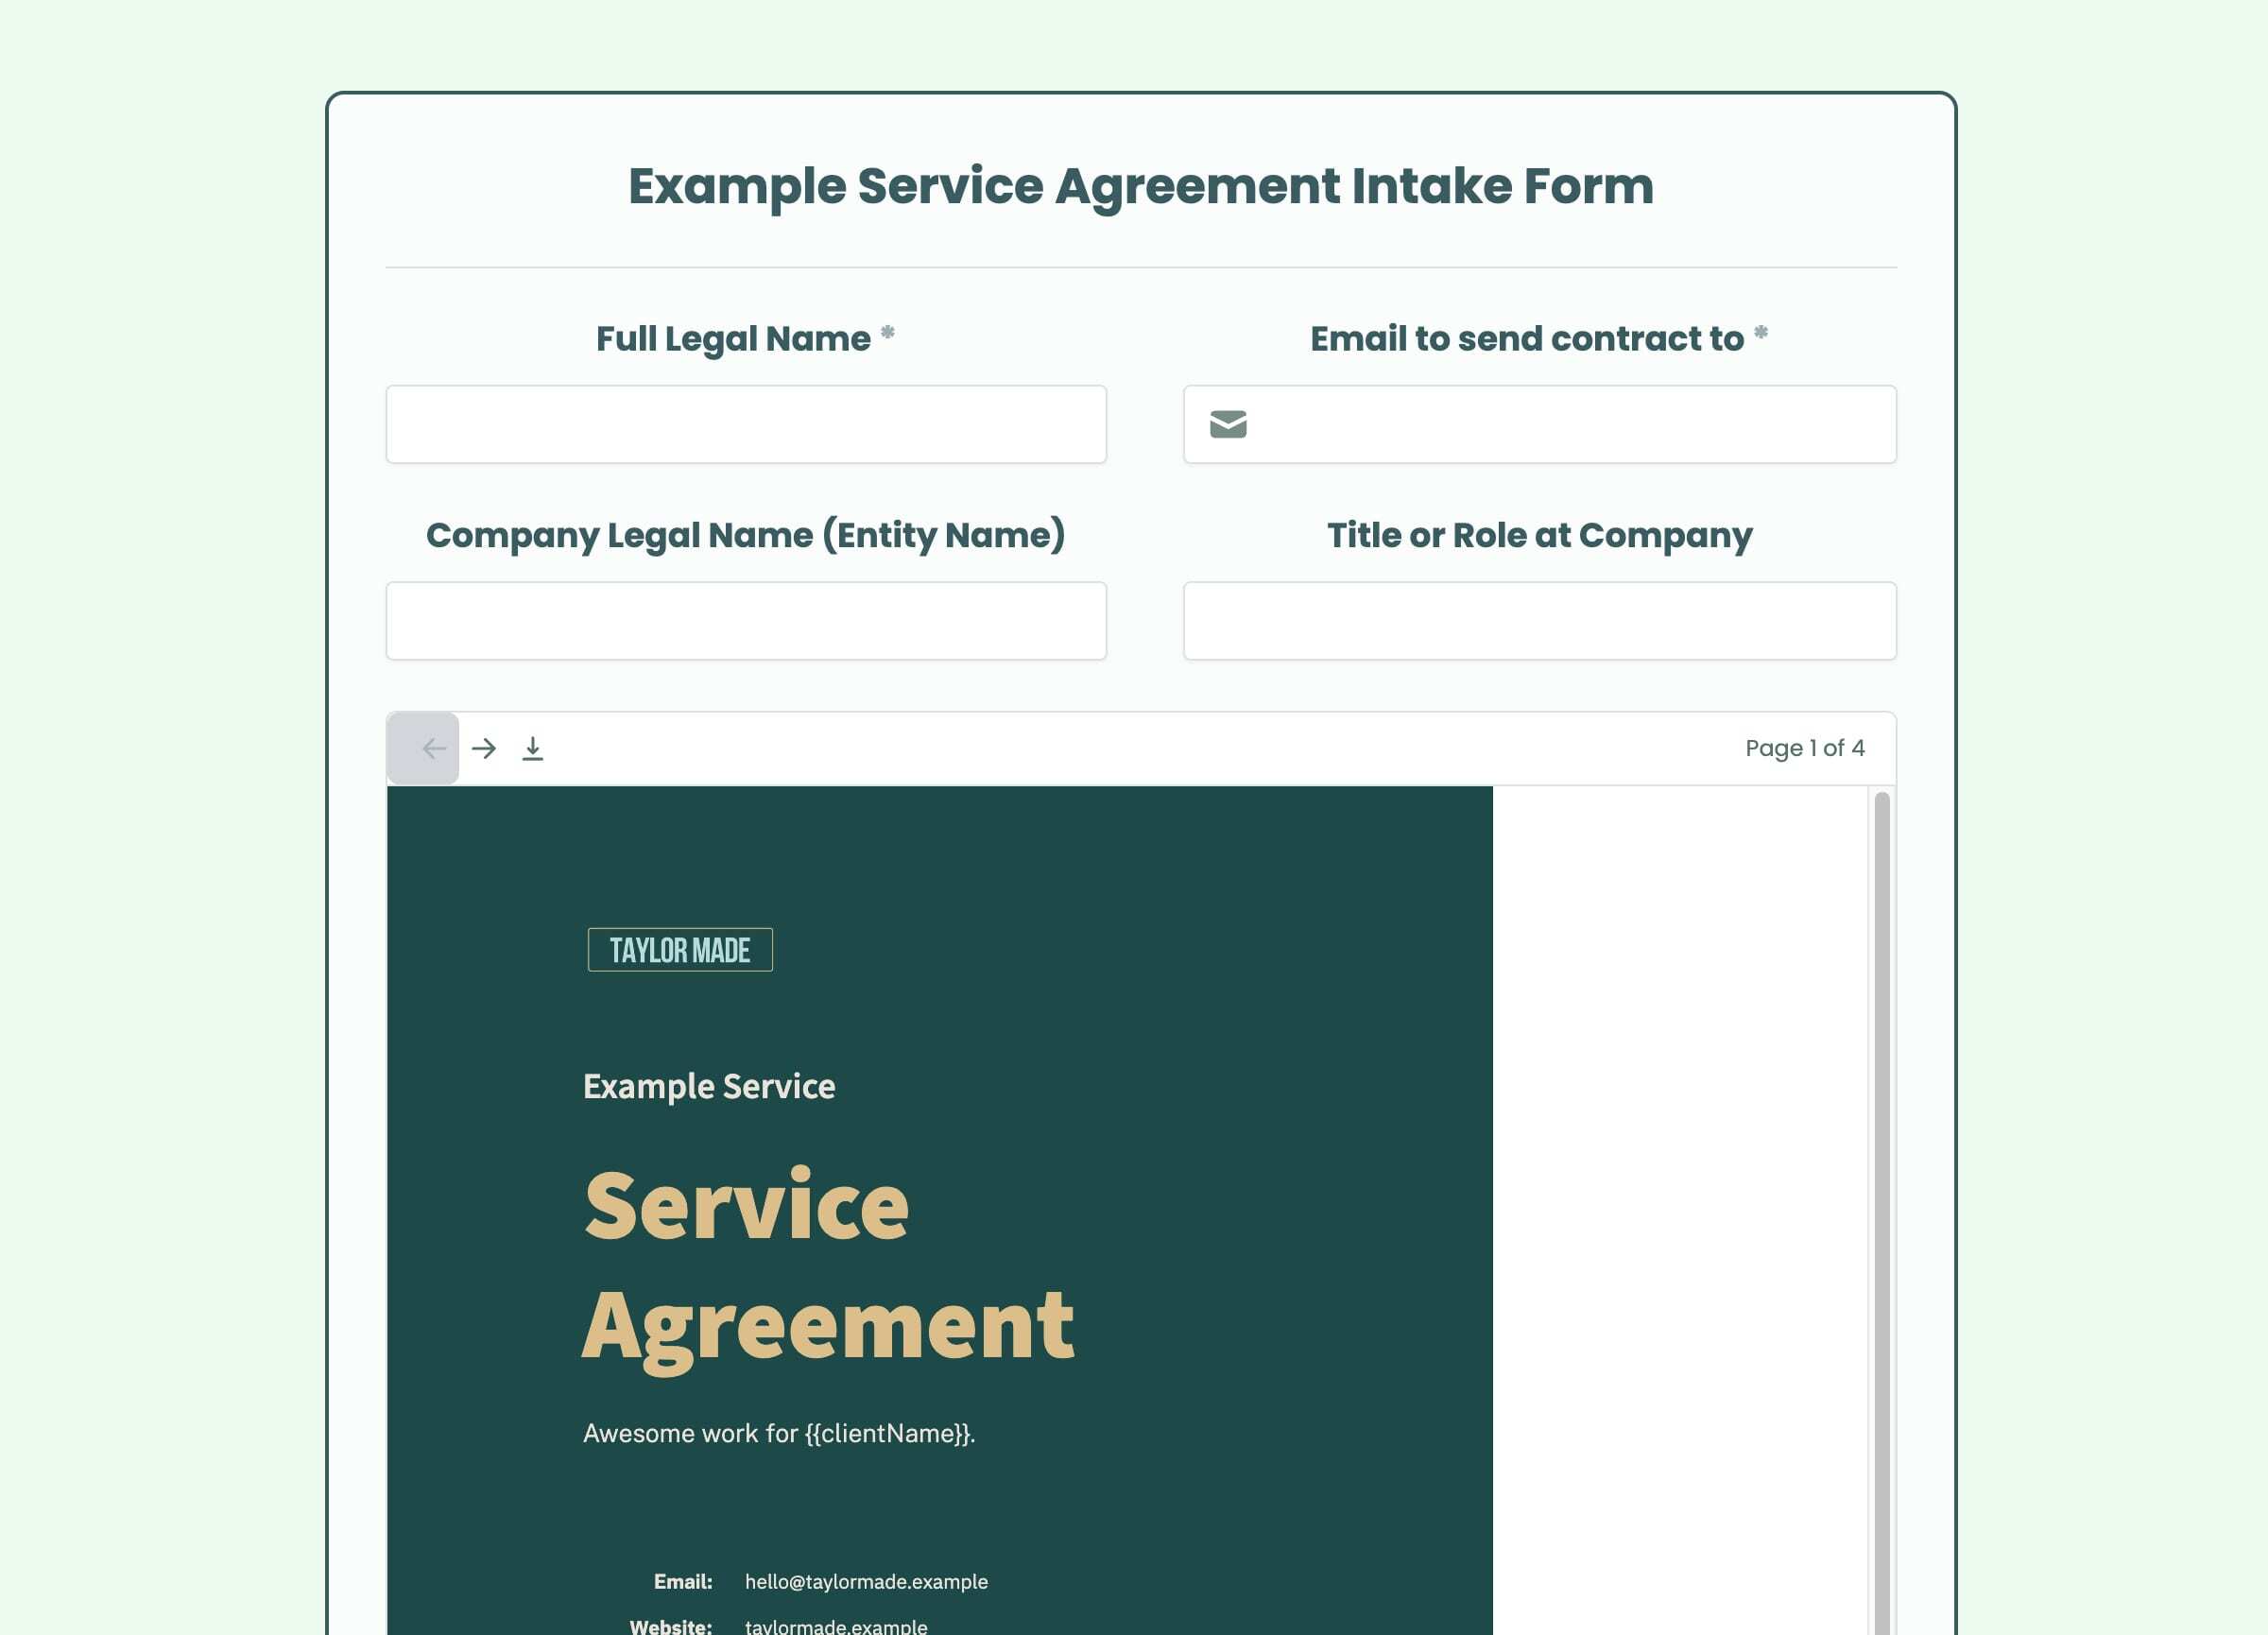
2.1 Clone the form template
Open the Fillout form template and copy it to your account.
2.2 Customize the fields
Update the form fields to match the placeholders in your Google Doc. At minimum, the form needs to collect client name, company, title, email, and signature.
If you renamed or added any {{placeholders}} in Step 1, update the form fields here to match.
2.3 Add your agreement PDF
Add a PDF Viewer field to the form and upload the PDF you exported in Step 1. This is where clients read the full agreement before they sign.
Step 3: Automation
The Automation
Relay picks up each new form submission and runs the workflow: it copies your published Google Doc, fills in the client's details, exports a signed PDF, and shares it automatically.
3.1 Clone the workflow template
Open the Relay workflow template and copy it to your account.
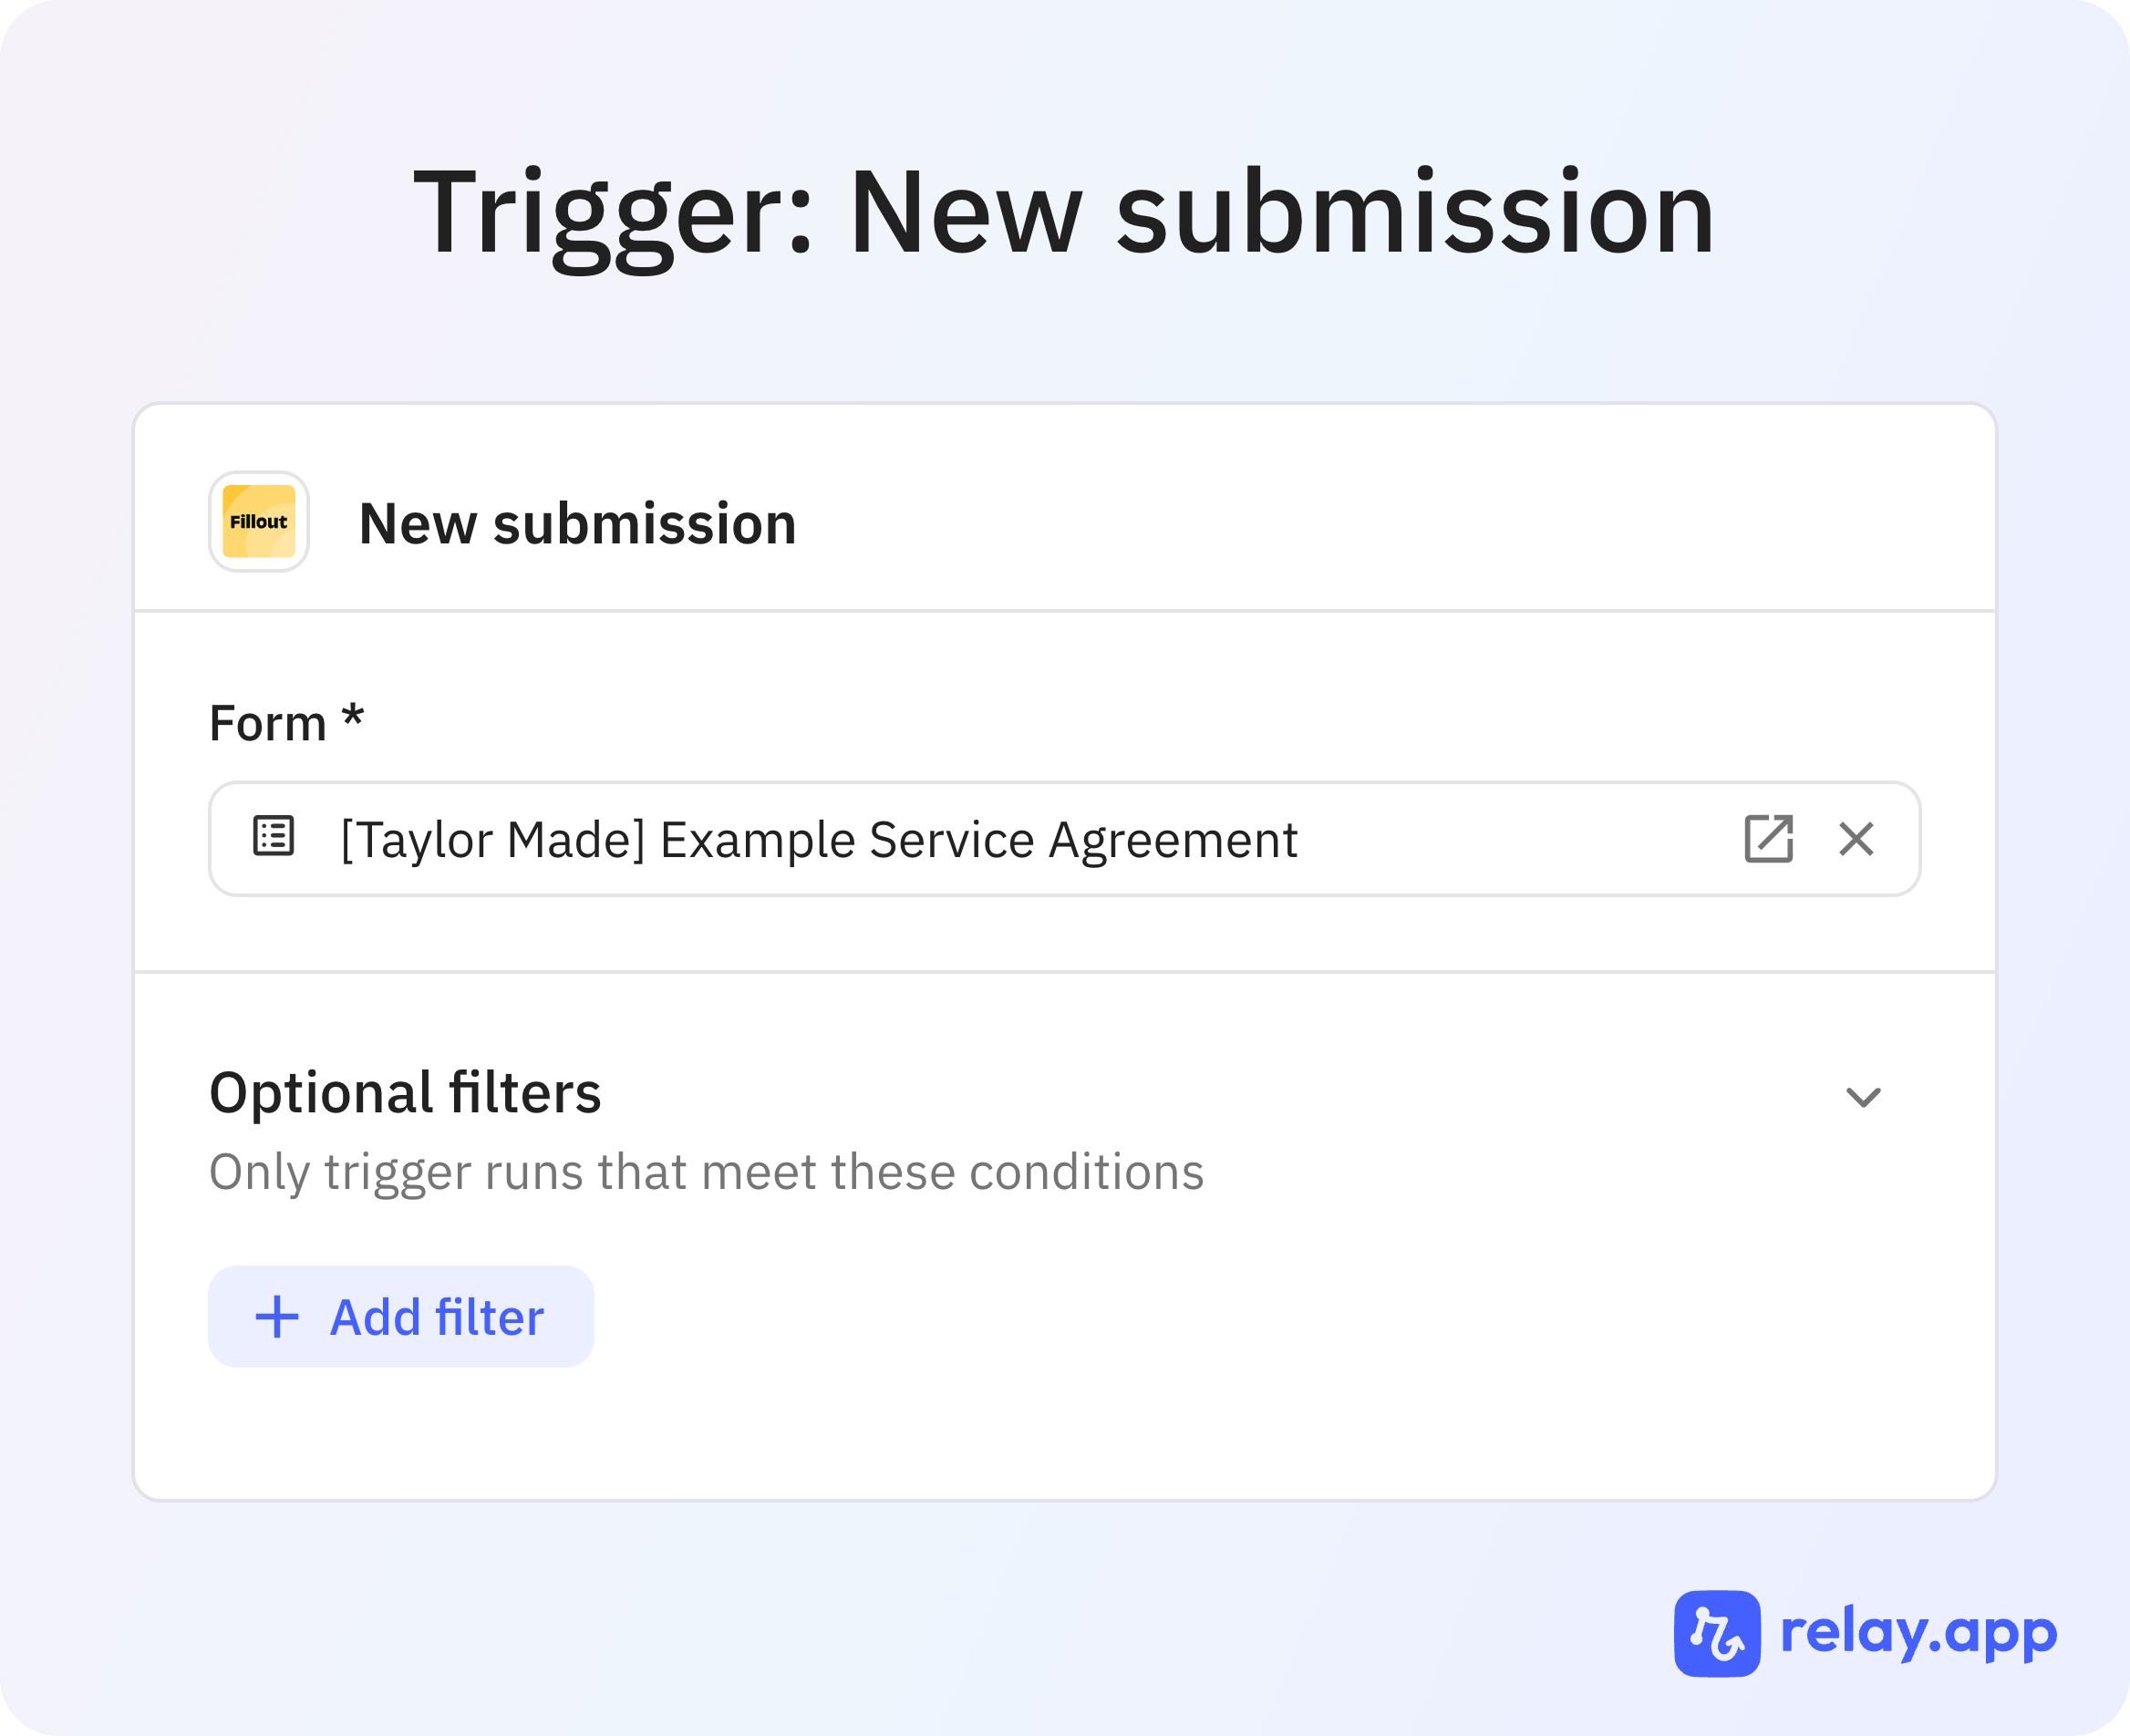
3.2 Connect your Fillout form
Set your Fillout form as the trigger. Relay starts a new run each time a client submits.
3.3 Connect your published Google Doc
In the copy step, link to the published version of your Google Doc from Step 1. This is the doc Relay copies and fills in for each client.
3.4 Verify the remaining steps
The rest of the workflow runs as configured in the template. Use the screenshots below as a visual checklist to confirm each step is wired correctly.
Relay workflow steps
Use these screenshots as the visual checklist for wiring the automation together.
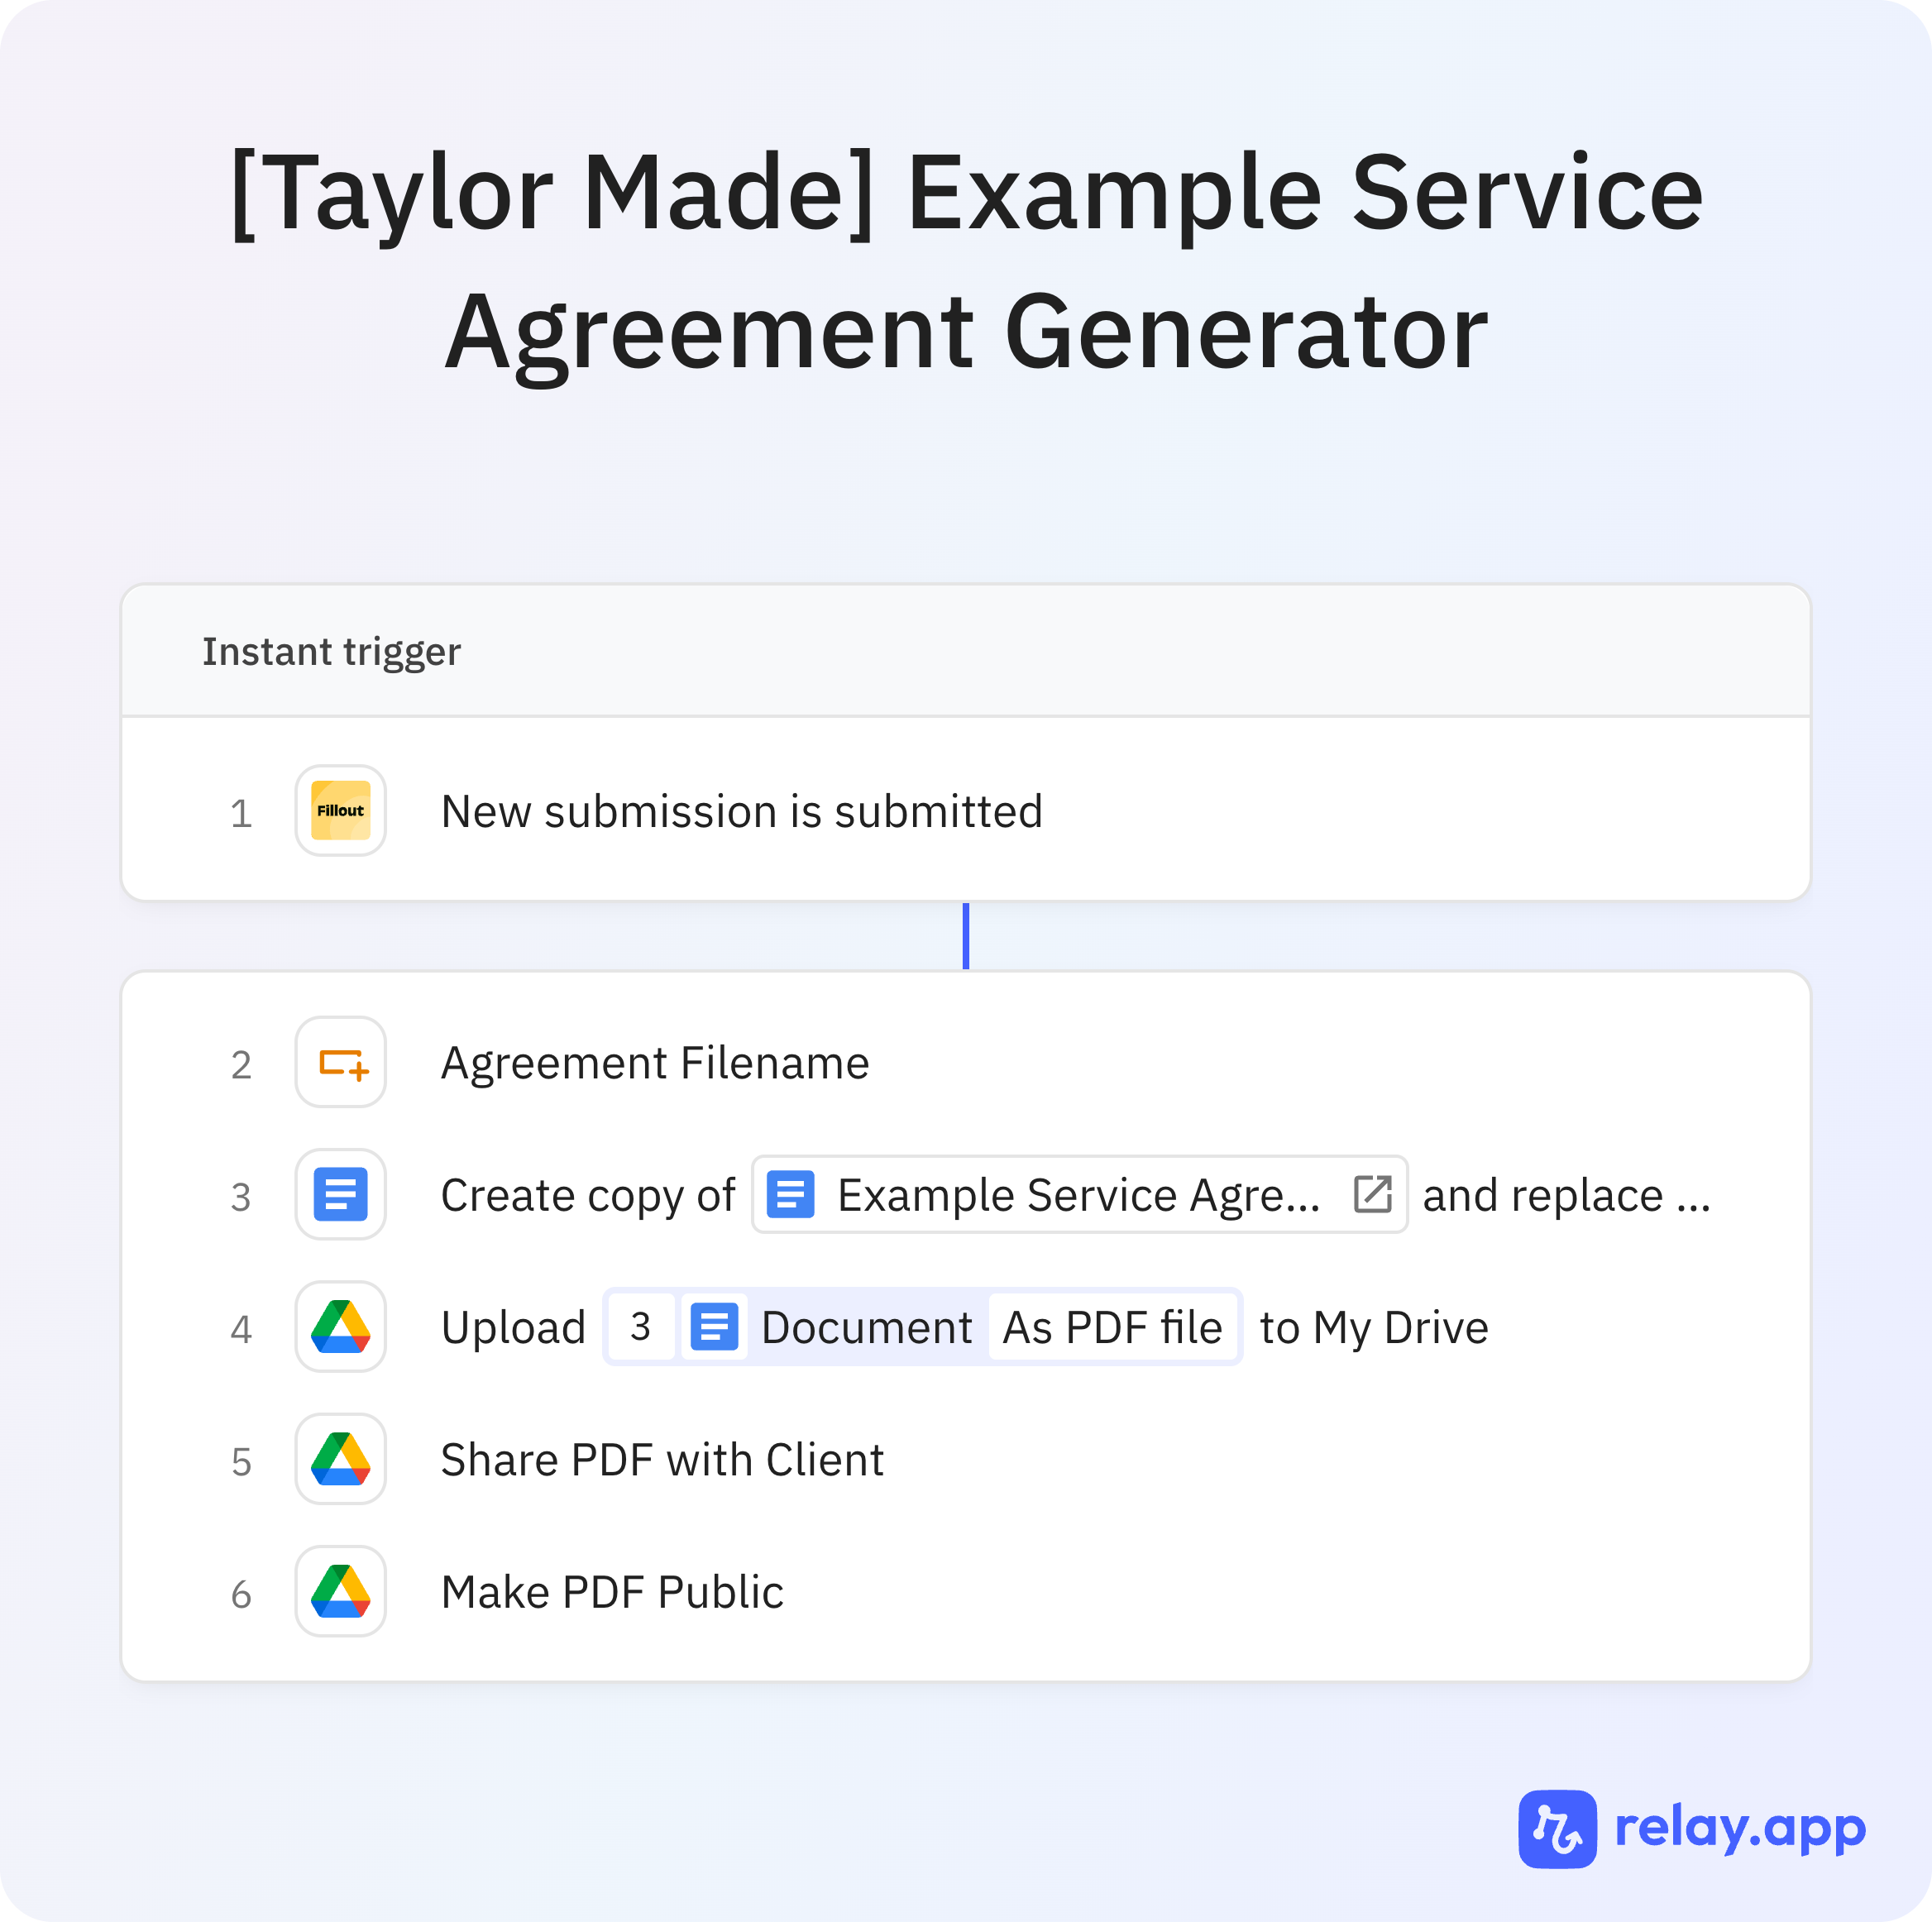
Workflow overview
The full automation flow at a glance.
Trigger: New Fillout submission
Relay starts when a client submits the intake form.
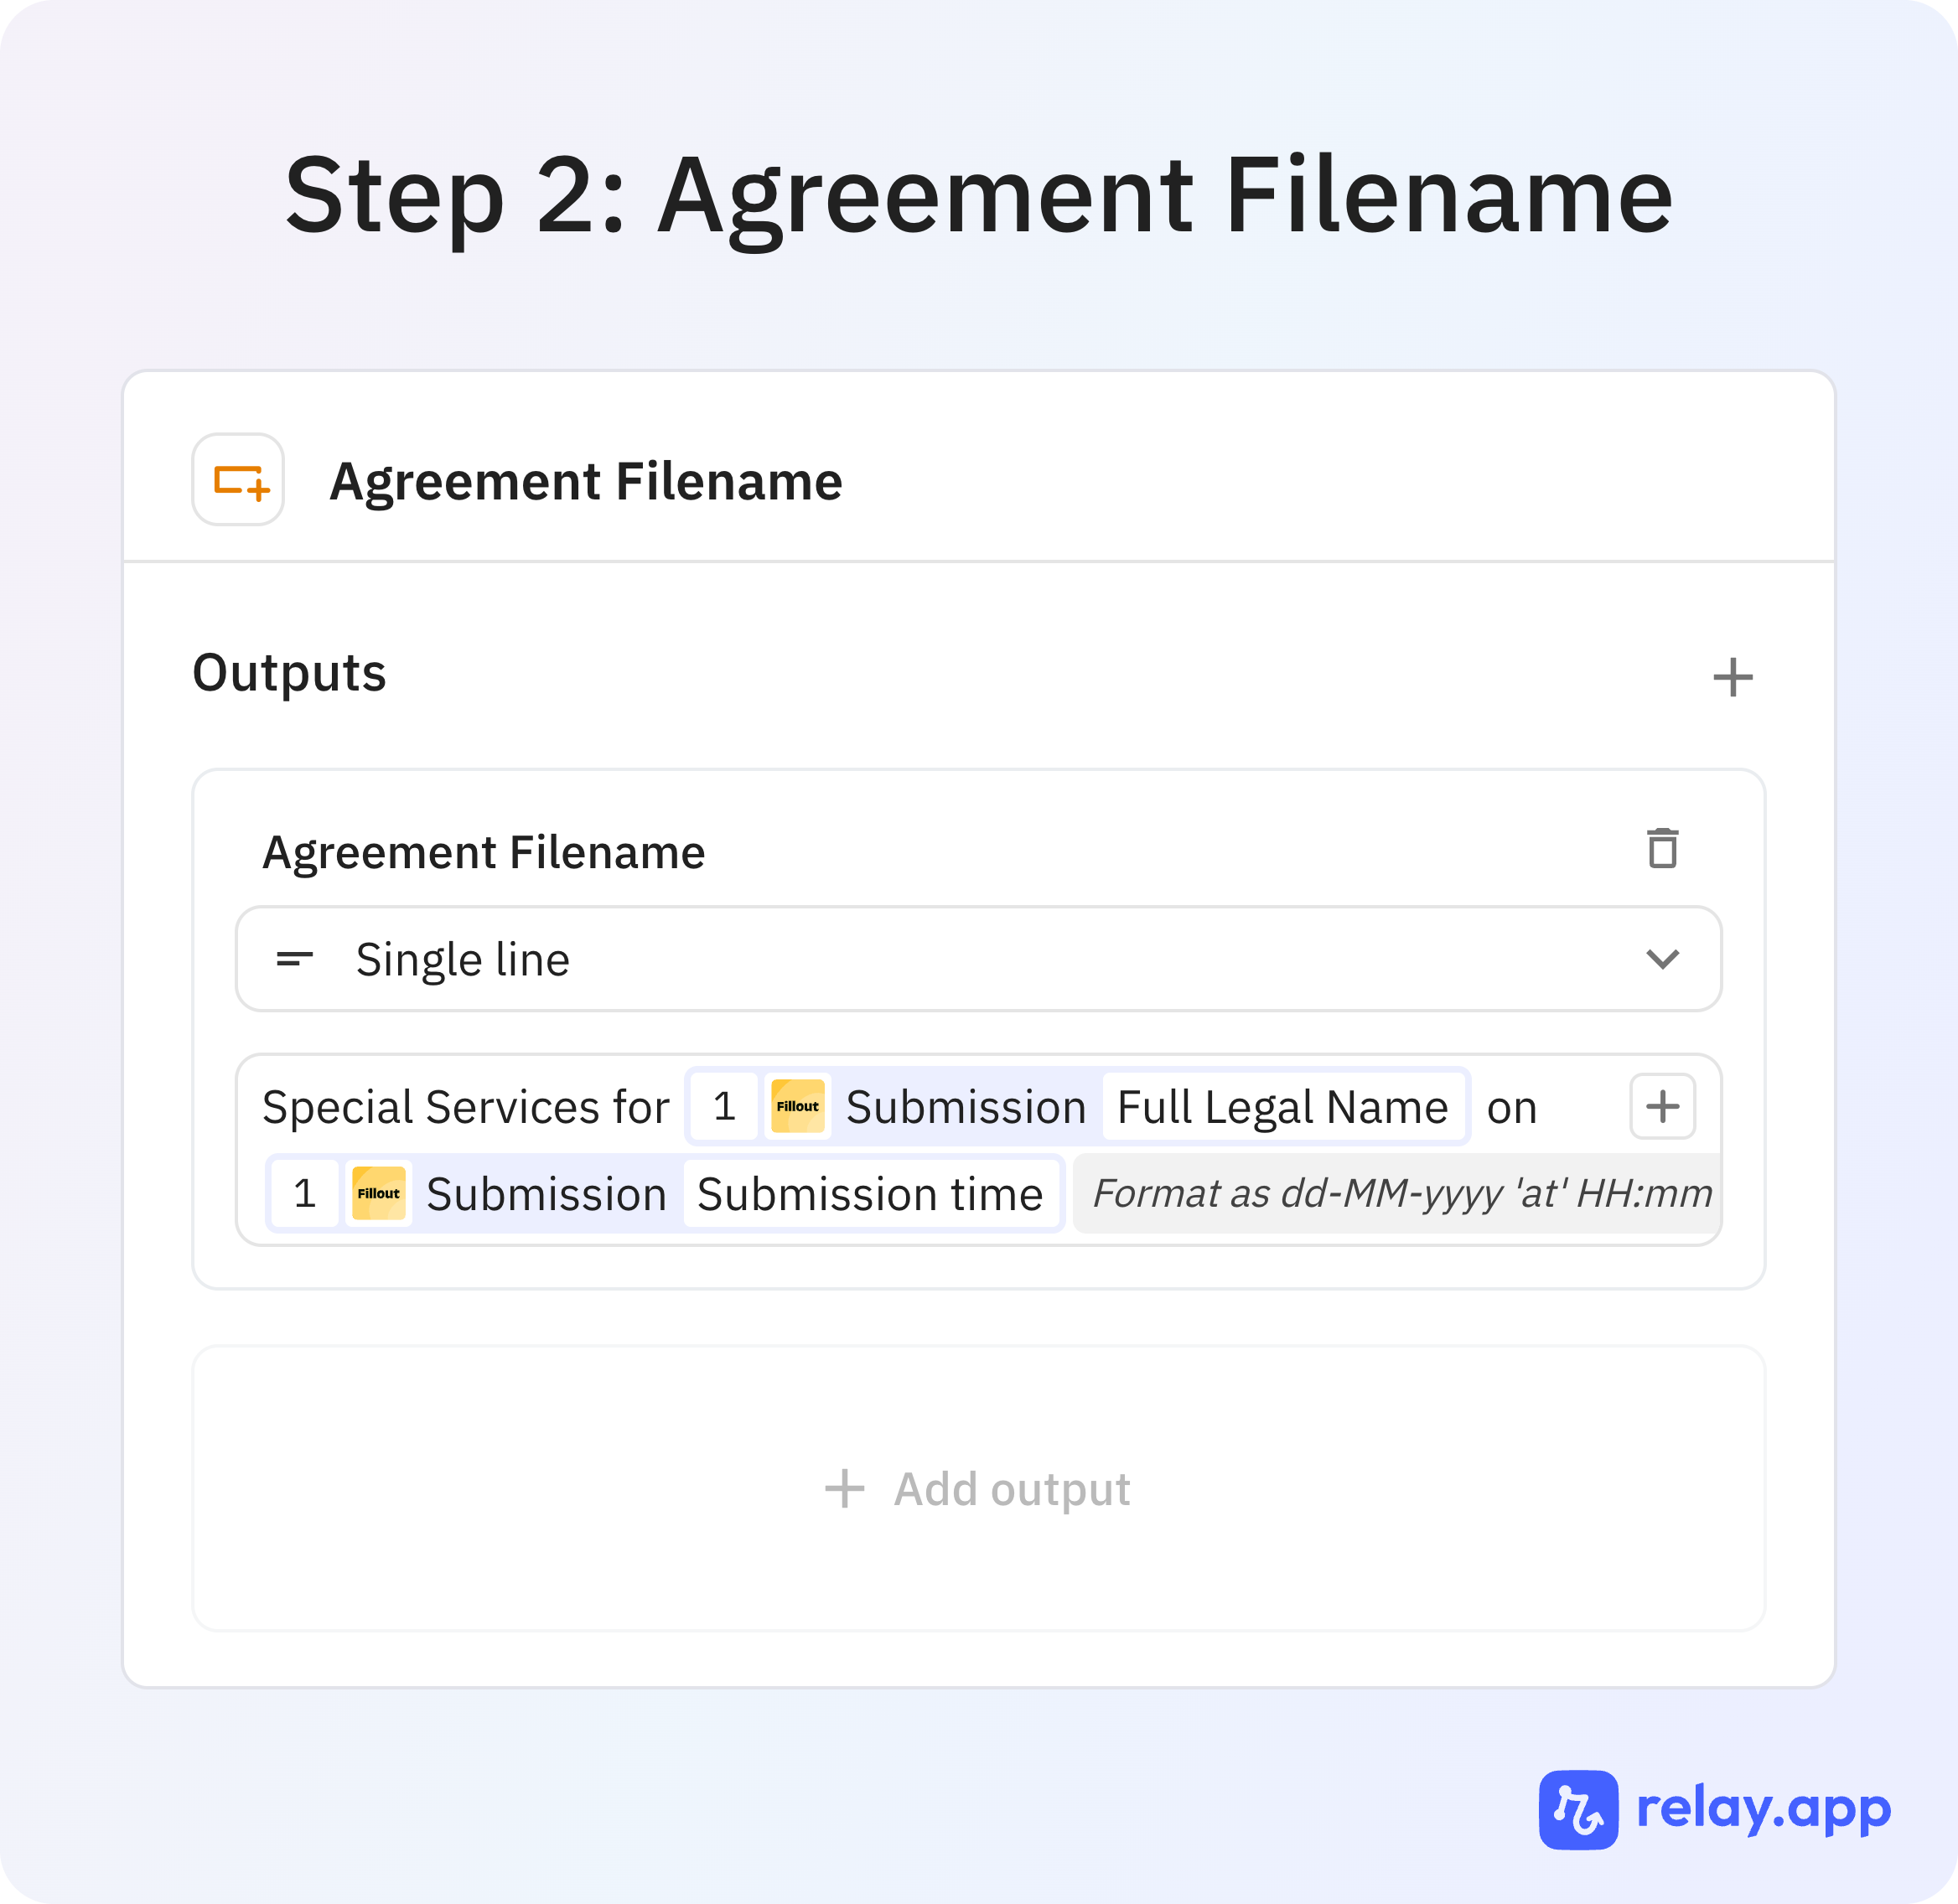
Build the agreement filename
Create a predictable filename for the generated agreement.
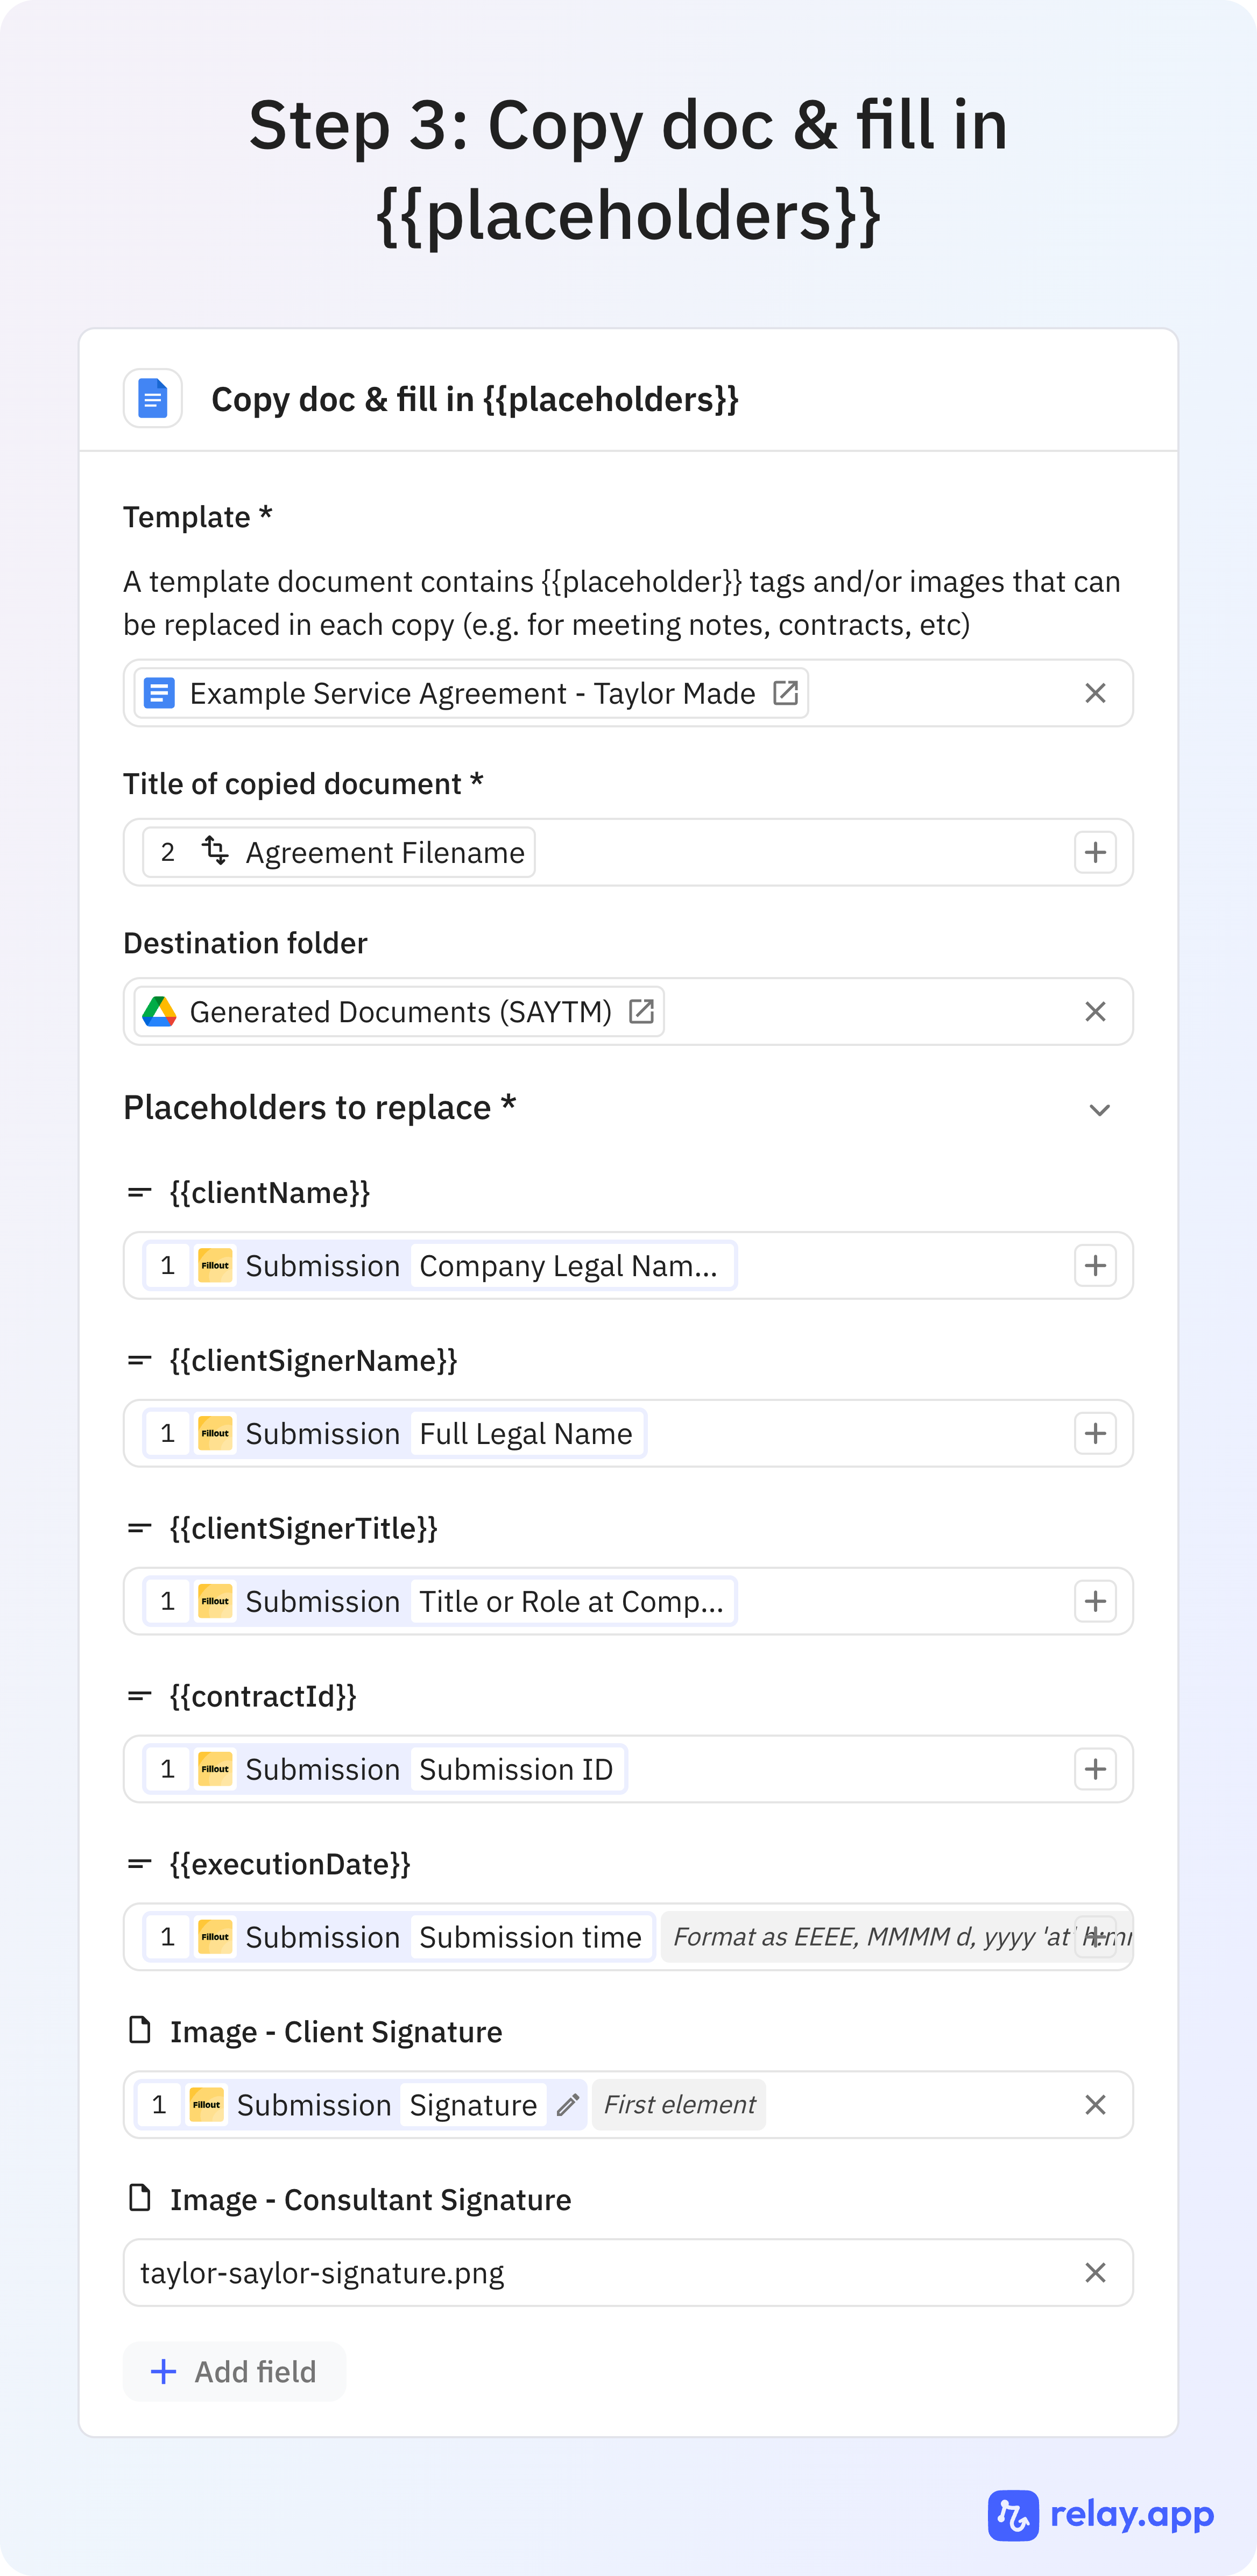
Copy the doc and fill placeholders
Relay copies the published Google Doc and merges the client details.
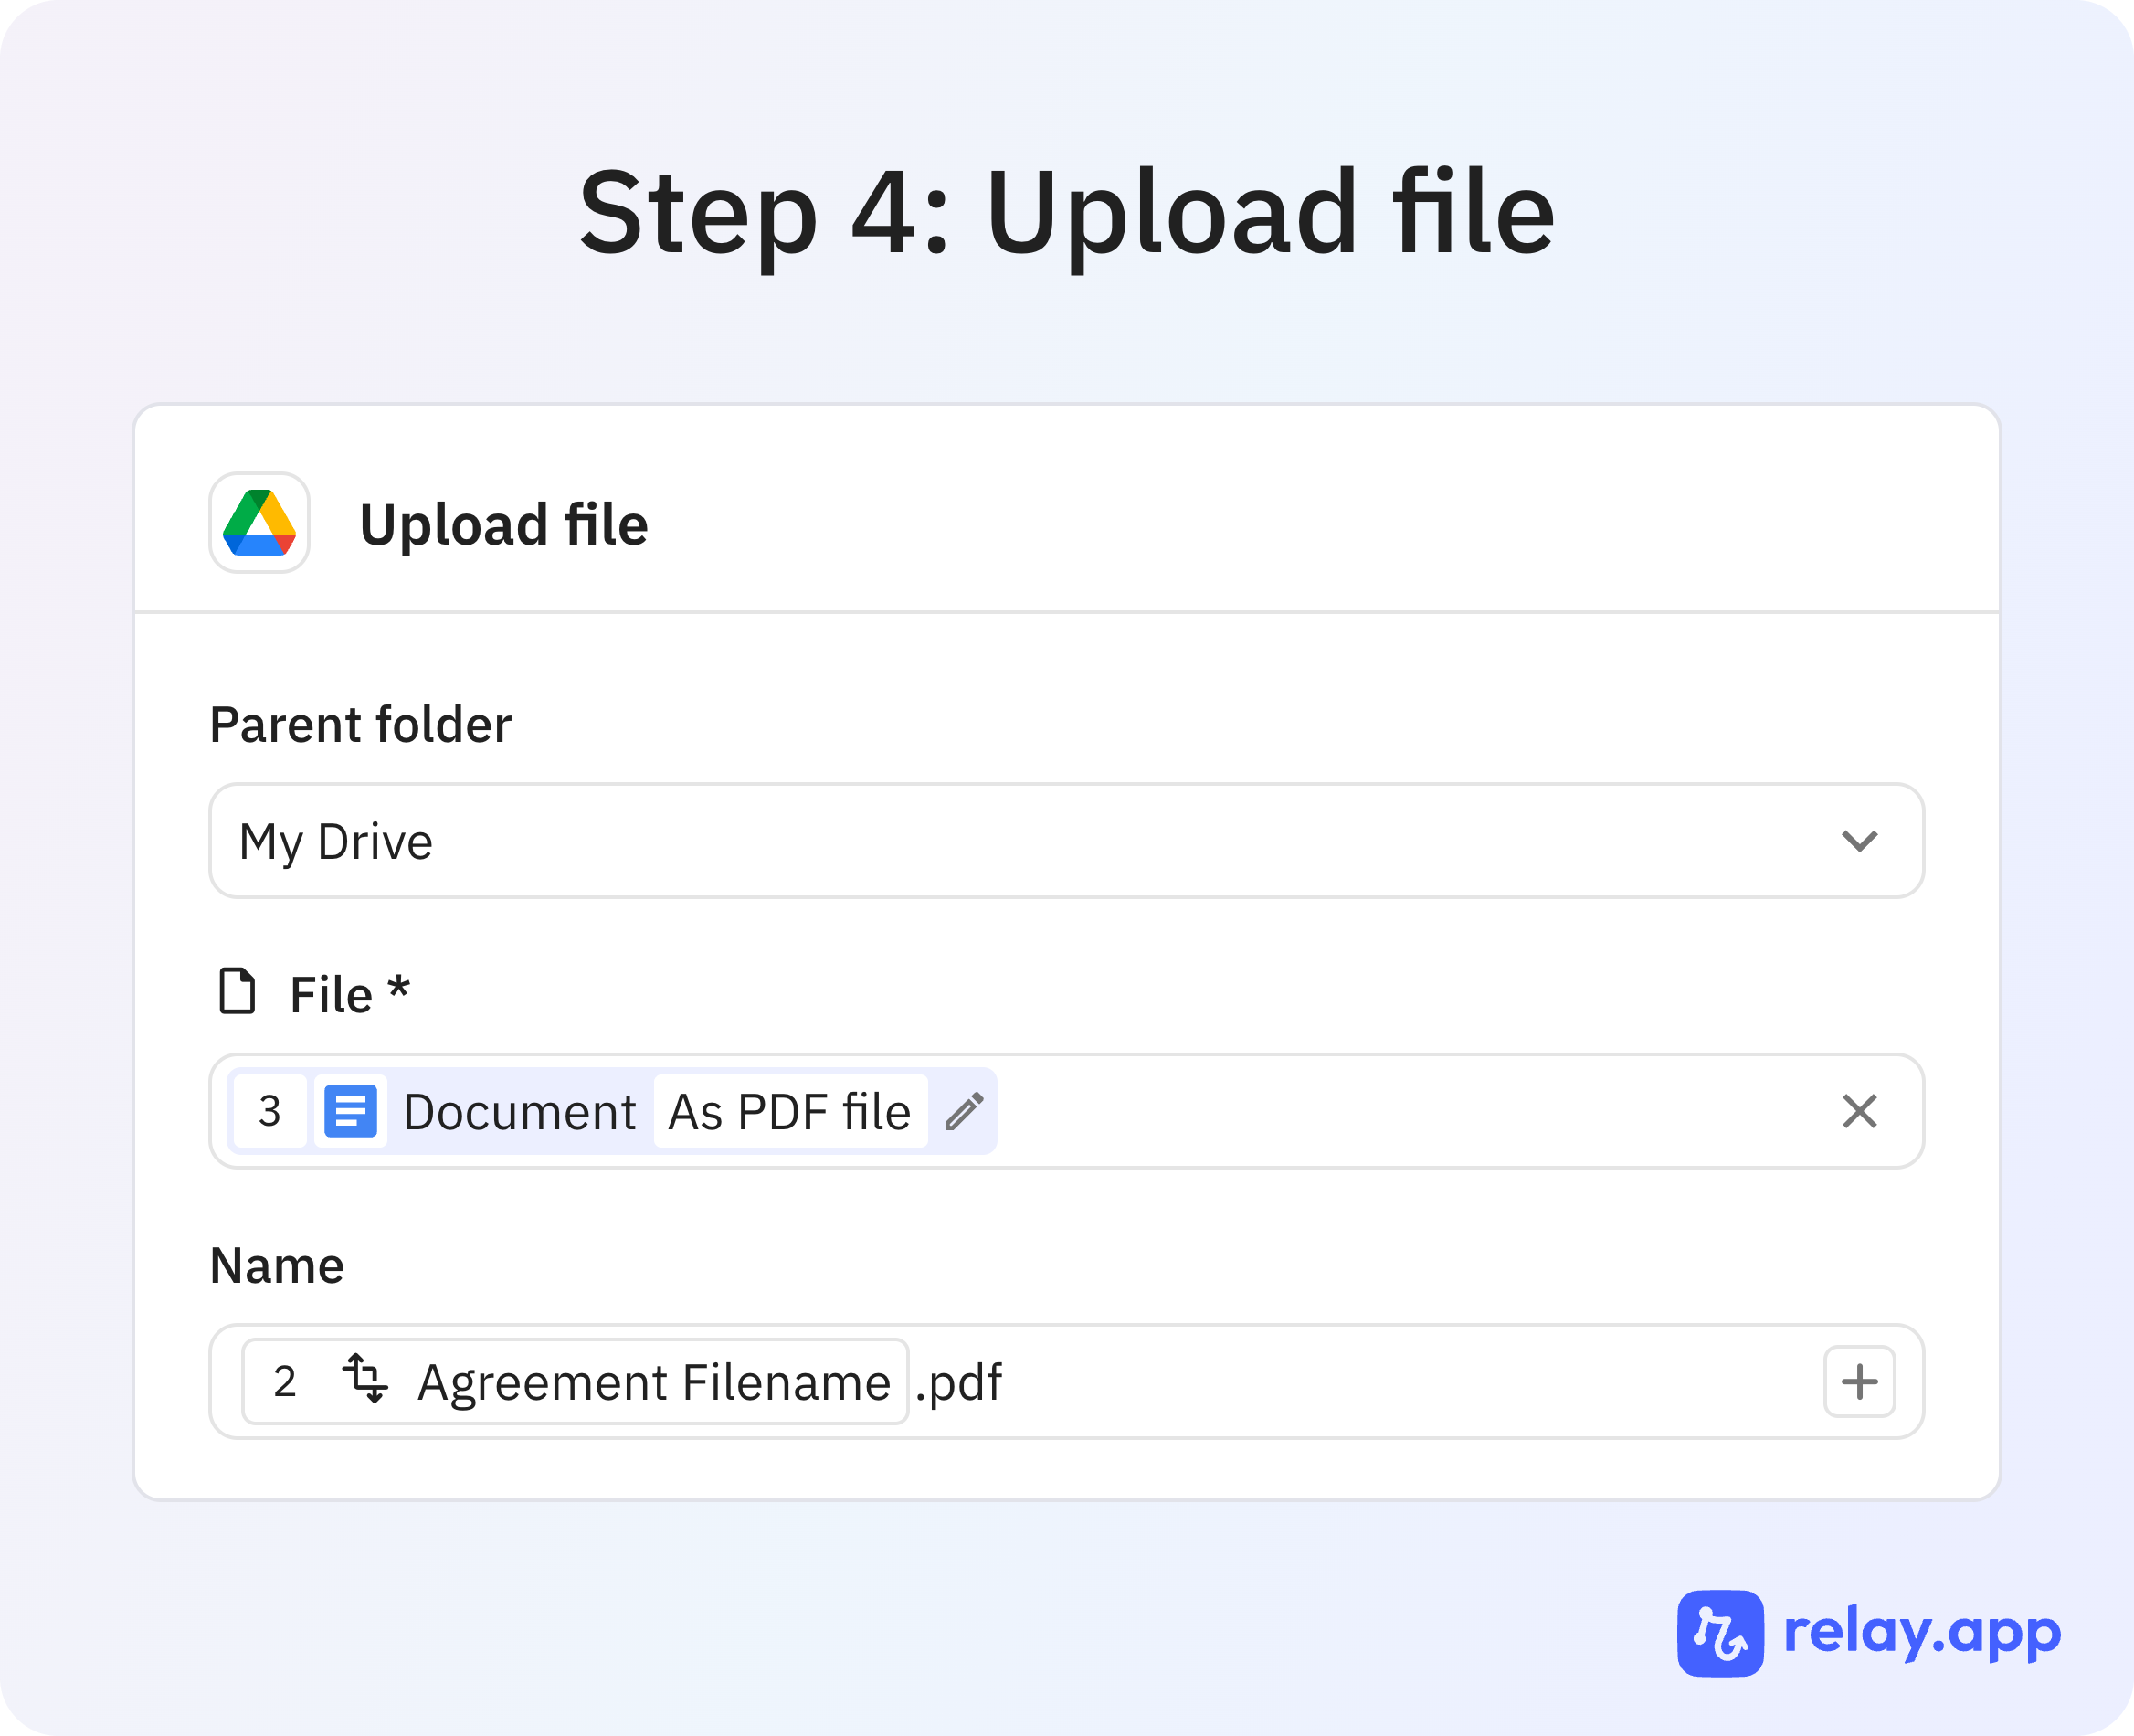
Export and upload the PDF
The completed agreement is exported and uploaded to Google Drive.
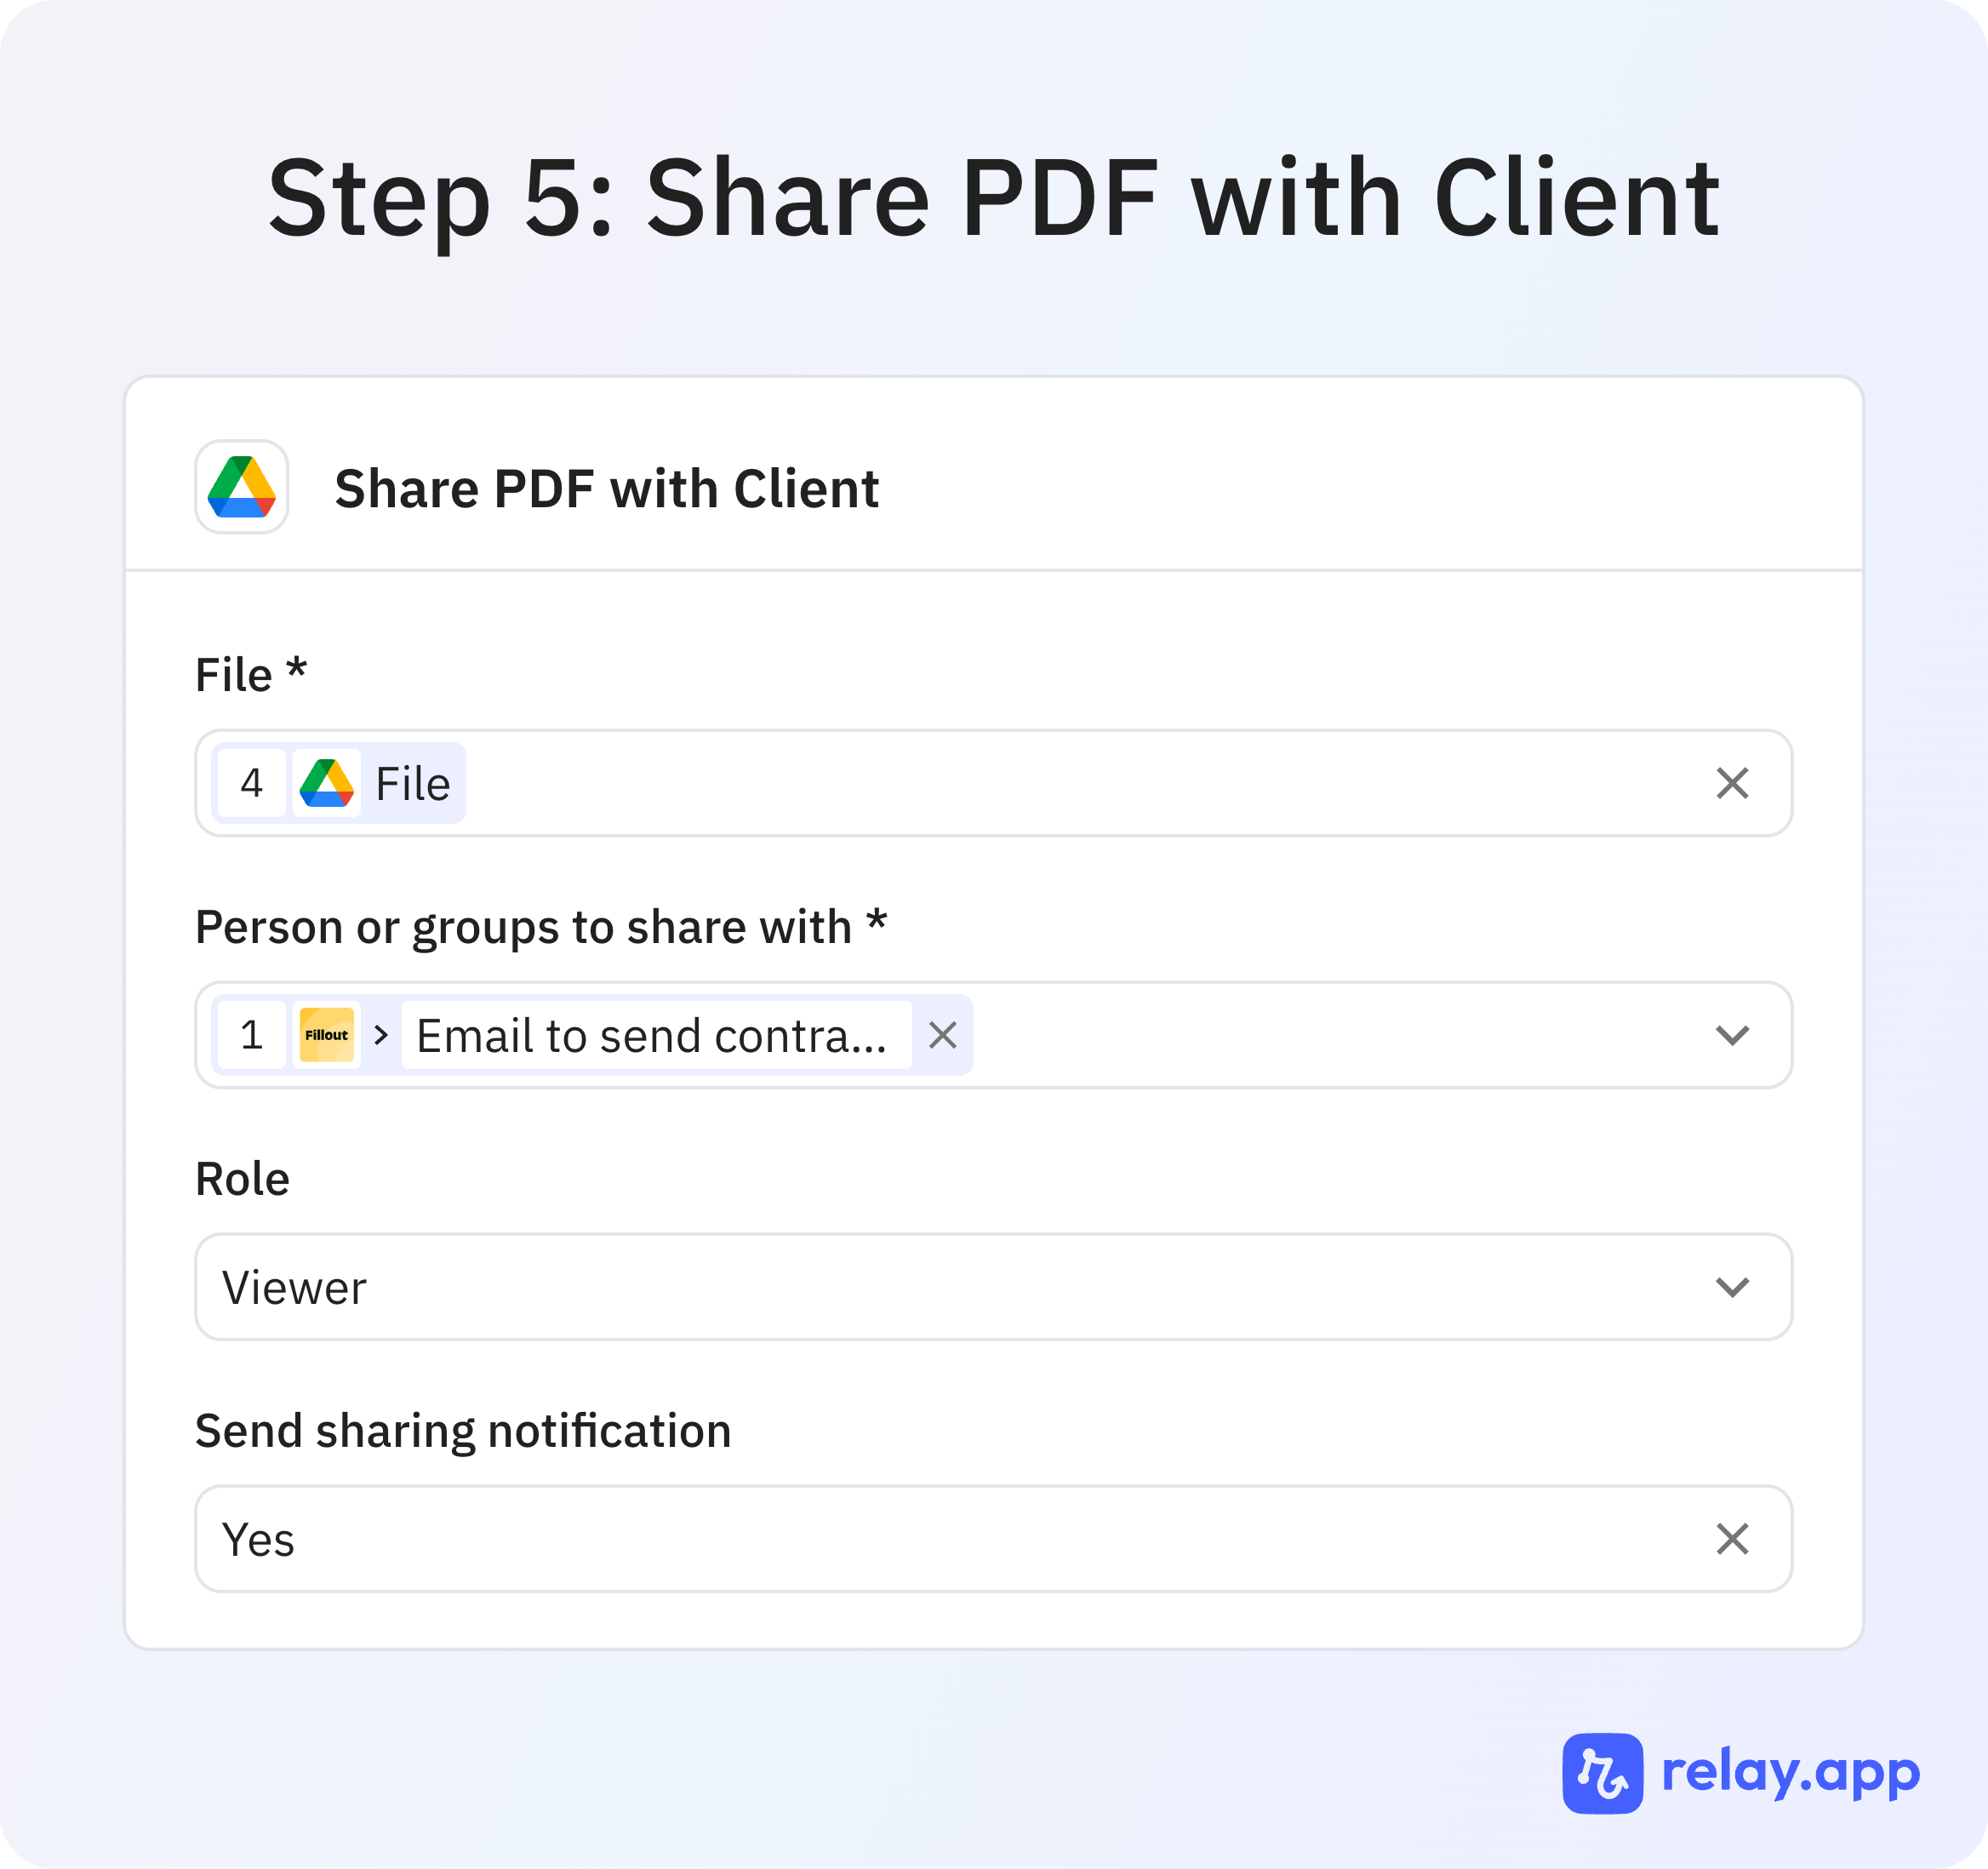
Share the PDF with the client
Share the generated file with the email address from the intake form.
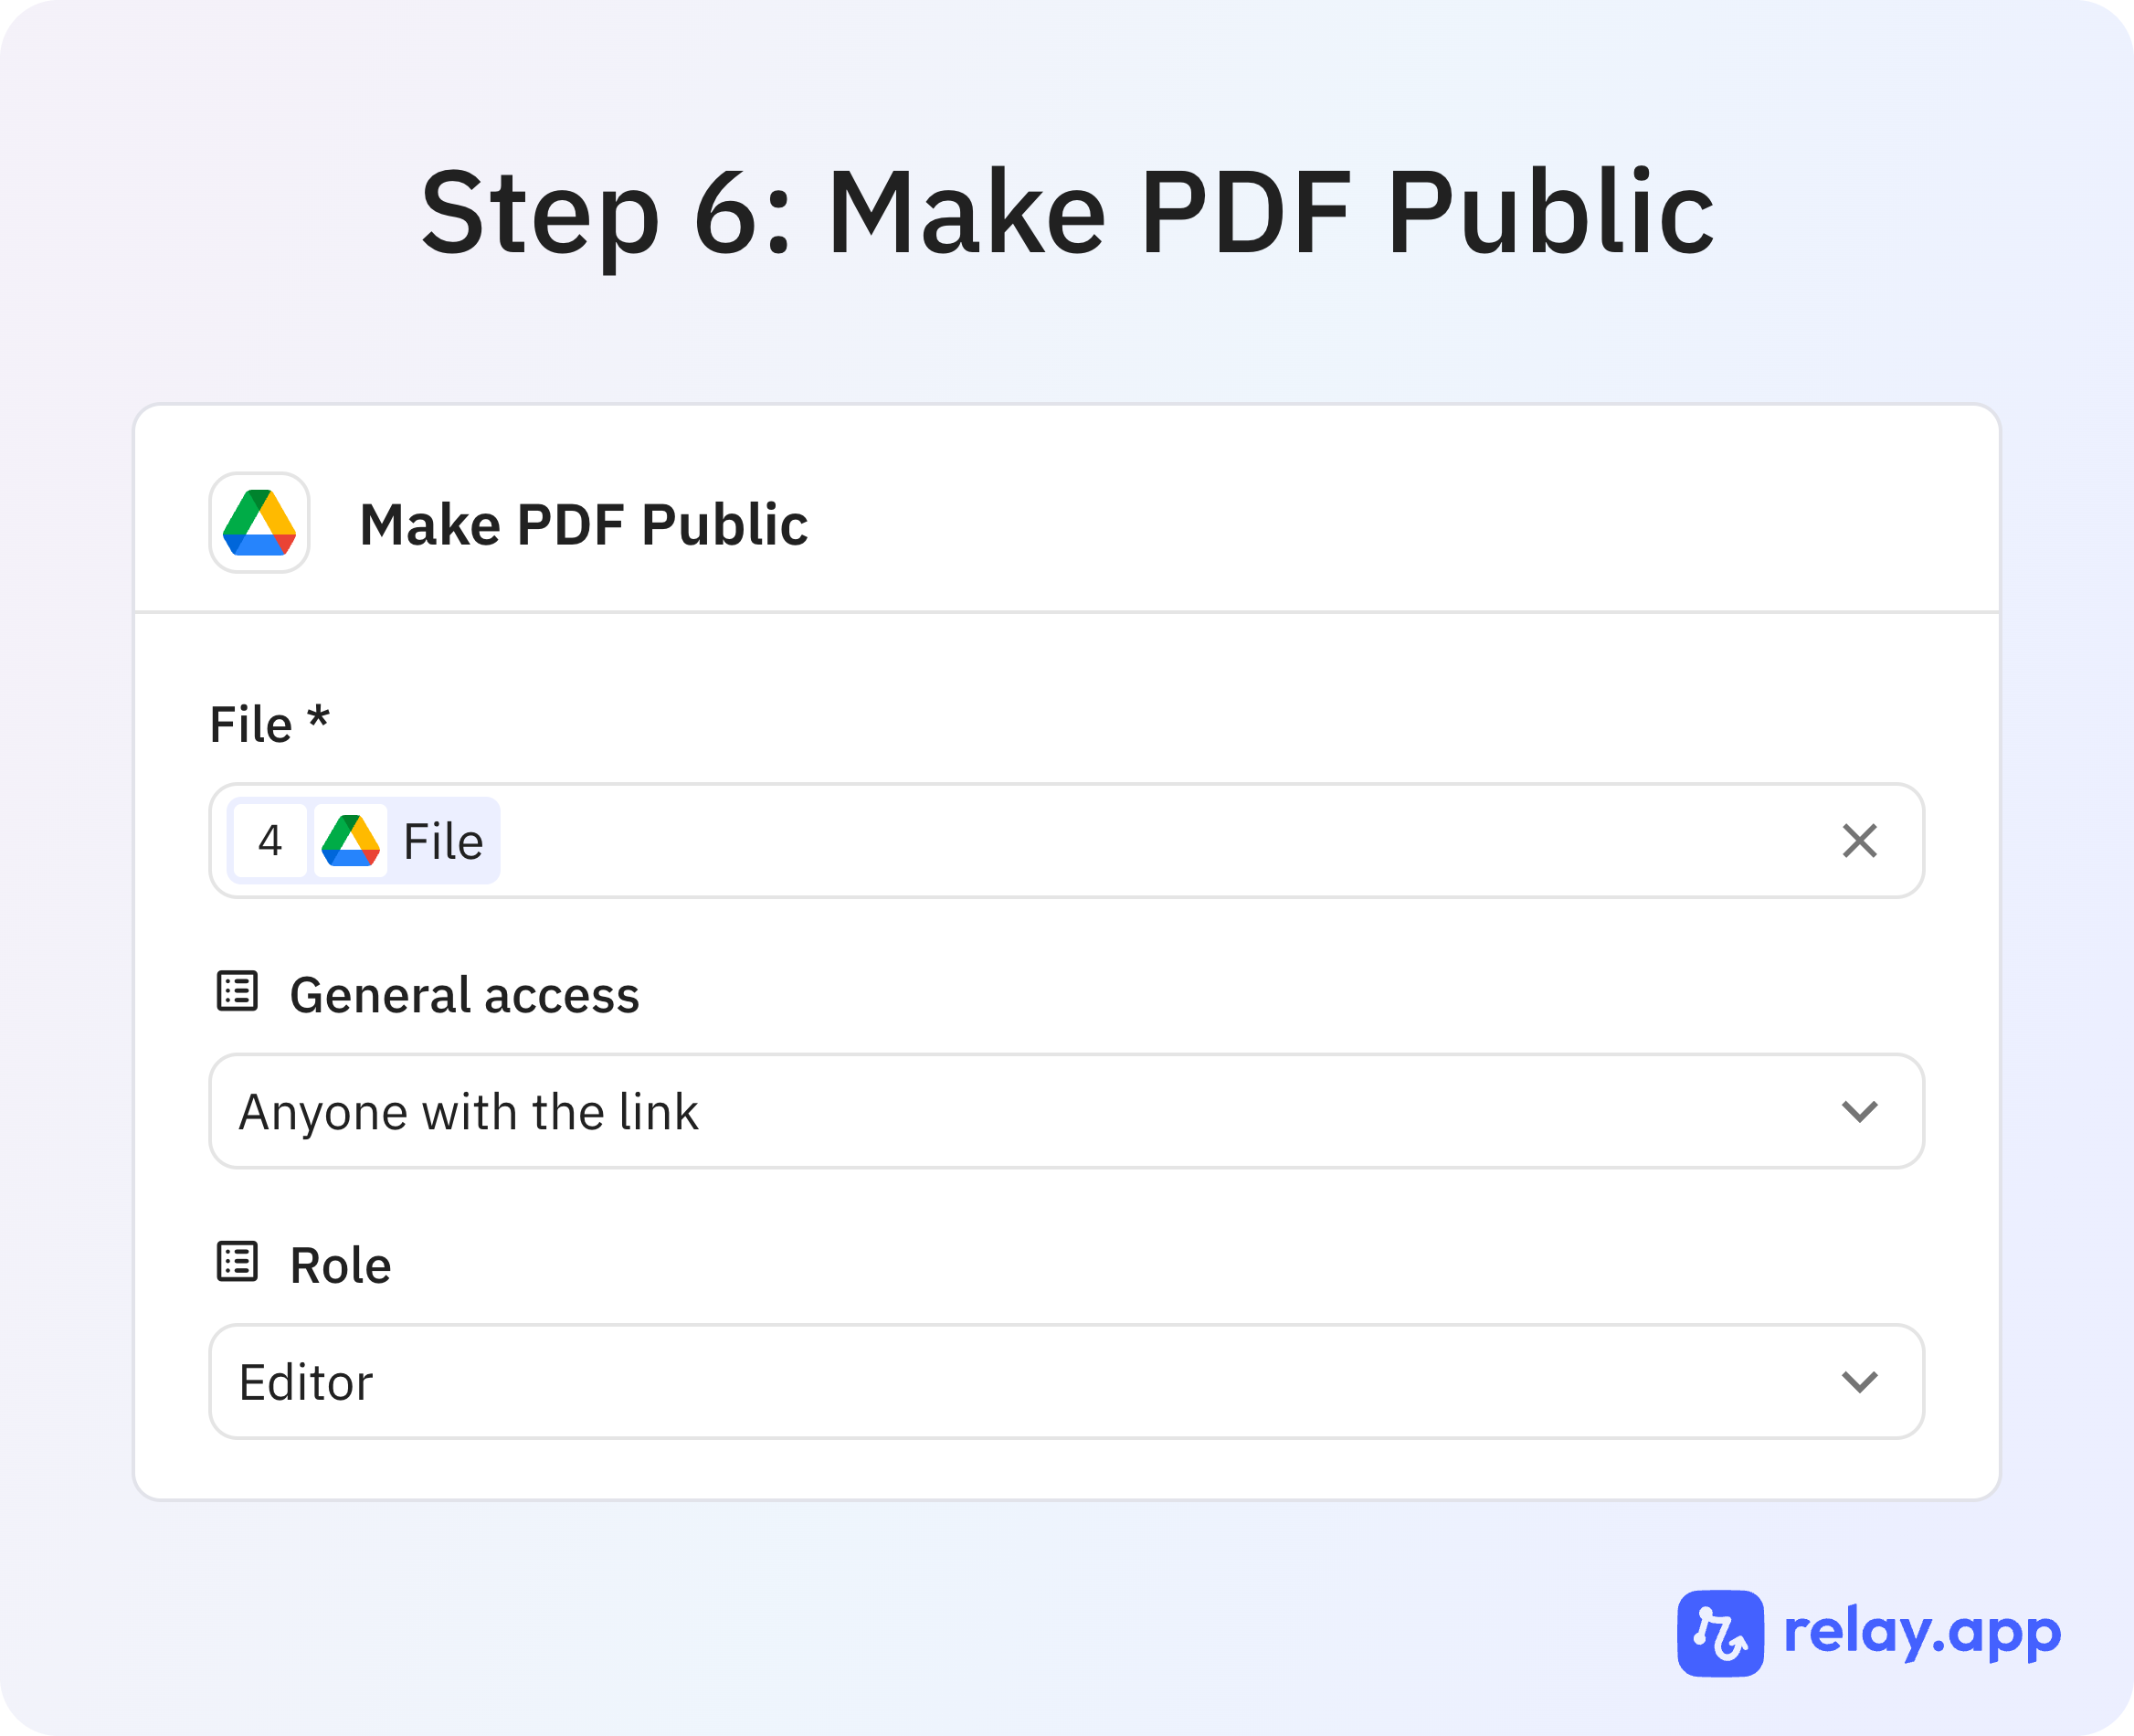
Make the PDF public
Optional step for making the agreement viewable by anyone with the link.
Customizing Your Google Doc
Business details and branding
- Open the Google Doc and go to Tools > Variables. Update your business name, email, and website. They populate throughout the doc automatically.
- Replace the logo images on the cover and signing pages with your own. Delete them if you prefer a text-only layout.
- Edit the scope, payment terms, and provisions to match how you work.
Placeholder reference
Each {{placeholder}} maps to a field in your Fillout form. When a client submits, Relay fills them in automatically. The name in your Google Doc must exactly match what Relay is configured to fill.
{{clientName}}: The legal name of the client's business or entity.
{{clientSignerName}}: The full legal name of the individual signing on behalf of the client.
{{clientSignerTitle}}: The signer's title or role at their company.
{{executionDate}}: The date and time the client submitted the form. Format as a human-readable timestamp in Relay (for example: May 18, 2026 at 3:42 PM).
{{contractId}}: The Fillout submission ID. Useful for looking up any agreement across your systems.
Customizing the Relay Workflow
Customizing Your Relay Workflow
Two things to configure before the workflow is fully set up: how your signature gets added to each agreement, and how the completed PDF is delivered to the client.
Your signature
Pick one approach and set it up consistently.
Option A: Upload in Relay (default). Add your signature image directly in the relevant Relay step. Relay inserts it into each agreement automatically. Use this if you want to update your signature without touching the Google Doc.
Option B: Embed in the Google Doc. Place your signature image in the published Google Doc template. It gets copied into every agreement automatically. Simpler to set up, but updating it means editing the doc and re-publishing.
Sharing with the client
Step 5: Share PDF with client. Relay shares the generated PDF using the email address from the form. Turn the Google Drive share notification on if you want the client to receive a Google Drive email. Turn it off if you plan to send a custom delivery email instead.
Step 6: Make PDF publicly accessible. This step makes the PDF viewable by anyone with the link, no sign-in required. Remove it if you want to require the client to be logged into Google to view the document.
Keeping Your Agreement Updated
Once the automation is running, you'll need to update your agreement from time to time and may want to extend what the workflow does. Here's how to handle both.
When you update your agreement
- Edit your working draft Google Doc
- Copy the final content into your published version
- Re-export the published version as a PDF
- Re-upload the PDF to your Fillout form
What clients read in the form should always match what gets generated.
Extending the workflow
Get notified when a new agreement comes in. Add an email step at the end of the Relay workflow to notify yourself each time a new agreement is generated. Useful for staying on top of new clients without checking Google Drive manually.
Send a custom delivery email to the client. If you turned off the Google Drive share notification in the sharing step, add an email step to deliver the agreement to the client on your own terms. This gives you full control over the message, timing, and branding of what the client receives.